


You’ve got good friends, good drinks, but something’s missing… a standout conversation piece for the center of your patio table. How about your very own DIY Concrete Fire Bowl. Why not?

MATERIALS LIST:
- Two different-sized bowls (one larger, one smaller)
- Chopped fiberglass
- Concrete (Substitute both fiberglass and concrete for a countertop mix and save time and money)
- Decorative crushed glass
- Concrete liquid release agent (Although we used petroleum jelly, we really don’t recommend it. Petroleum jelly makes acid staining unnecessarily difficult and the entire surface MUST be sanded before applying a concrete acid stain.)
- Wire mesh (and something to cut it into a round shape)
- Drill with concrete bit attachment
- Gel fuel can (I used Sterno, usually located in the camping section.)
- Lighter
- Goggles
- Gloves
- Sandpaper
- Foam brush
- Deco Gel Acid Stain
- Baking Soda
- Water-based acrylic sealer

Time needed: 3 days
HOW TO MAKE A CONCRETE CONCRETE FIRE BOWL
- MIX YOUR CONCRETE
Mix concrete and chopped fiberglass reinforcement. Add water until you get a pancake batter texture. If using a countertop mix, simply follow the product instructions. Use gloves when handling concrete materials as concrete can be a skin irritant.
- POUR CONCRETE MIX
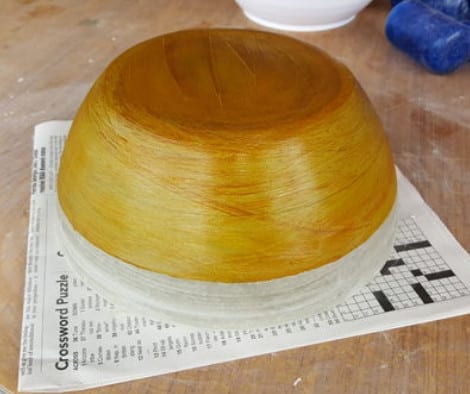
First, spray the larger bowl thoroughly with Concrete Liquid Release Agent. Then pour the concrete mix into the larger bowl.
- SET THE SMALLER BOWL INSIDE THE LARGER BOWL
Before setting the smaller bowl inside the larger bowl, spray the outer surface of the smaller bowl thoroughly with Concrete Liquid Release Agent. Be sure to leave room at the bottom between the larger and smaller bowls so you get a consistent thickness throughout the cast. Weight the smaller bowl so it won’t float out while the concrete is curing. Allow cast to cure for at least a week if using regular concrete and three days only if using a countertop mix.
- REMOVE CAST
Once the concrete mix has cured, gently remove the larger bowl and smaller bowl from the concrete cast.
- SAND
Sanding removes rough edges and prepares concrete for acid staining. If using any lubricant besides Concrete Liquid Release Agent; sanding is NOT optional.
- WASH THE CONCRETE CAST
Wash the concrete cast with warm, soapy water. A mild detergent soap is all that’s required for this step. Rinse thoroughly with clean water.
- APPLY ACID STAIN
With the concrete cast slightly damp, apply concrete acid stain. I used the Coffee Brown Deco Gel Stain but any of the other 8 colors would work fine. Since these acid stains are gelled, the stain won’t drip while applying so got really nice lines on the surface.
Concrete Fire Bowl Staining with Coffee Brown Deco Gel - NEUTRALIZE THE ACID STAIN
Once the stain has been processed for the recommended period of time, neutralize the stain with a baking soda and water solution. Read How To Neutralize Acid Stain for detailed instructions.
- DRILL A DRAIN HOLE
Drill a drain hole in the bottom of the cast. This keeps the fire bowl from filling with rain water and creating a mosquito fest in your patio. The drain hole also allows oxygen to fuel the flame.
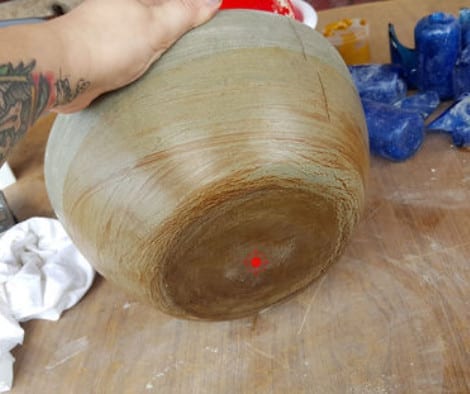
Drill a Drain Hole on The Bottom of the Concrete Cast - SEAL THE CAST SURFACE
Apply a thin coat of a high gloss (or satin if your prefer) water-based acrylic sealer. Allow sealer to dry completely.
- CUT WIRE MESH
Cut a round piece of wire mesh to fit inside the concrete bowl. You can use the small bowl opening to draw a circle. The circle should be small enough to go inside the concrete cowl but not too small that it touches the bottom.
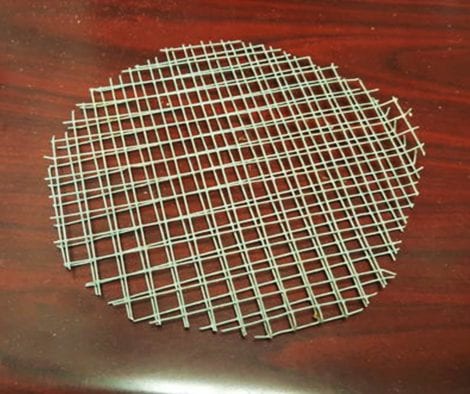
Cut Wire Mesh For Fire Bowl - ASSEMBLE
First, place a gel fuel can inside the bowl (I used Sterno). Then place the round wire mesh on top of the gel fuel can. Finally, put crushed glass aggregate on top of the mesh. Leave an opening in the center for the fire to breathe. We used a #3 Deep Sea blue Glass for this project.
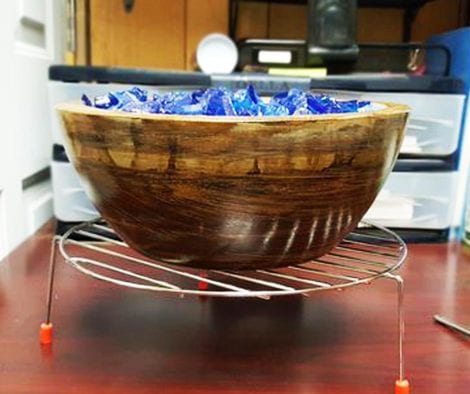
Elevate Fire Bowl For Aeration


